- Get link
- X
- Other Apps
“Shot with iPhone” has been the campaign for Apple’s products and strongly prove that iPhone is powerful enough to take great photos without any further equipment. Without any doubts, iPhone is able to take snaps with the powerful shooting features. In order to make excellent photos, you should make full use of the camera features and functions. However, for majority users, what they only get familiarized about iPhone is the basic functions of camera. But if you are fond of taking photos, then you must be interested on how to take pictures with iPhone in the better way. In this article, we would take you to get access to more tips, tricks and hidden iPhone camera features if you would like to be a professional iPhone photographers. In such a way, you can use your iPhone for quick and easy access to the camera functions and you would obtain a lot of photo shooting fun.
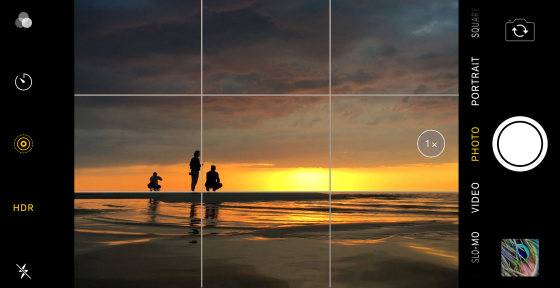
1. Use Grid for Better Compositions
For
iPhone, you can see the grid for photo shooting. The grid line is also called
"golden line". After opening, it can automatically correct the line
to help take good-looking photos. Open the settings function and click the
camera to open the grid line. What is the "golden section"? To put it
simply, grid line can help to divide the picture you want to take in nine
square grids, and then obtain better compositions for the whole subject. If
there is no grid reference, it is difficult to divide the photo according to
the exact ratio. For iPhone 12, users can turn on "Grid" in
"Settings" >> "Camera" to activate the function.
Using grid can help you to keep the horizon level in landscape photos, straight
or horizontal lines in architectural photos, and taking perfectly symmetrical
photos.
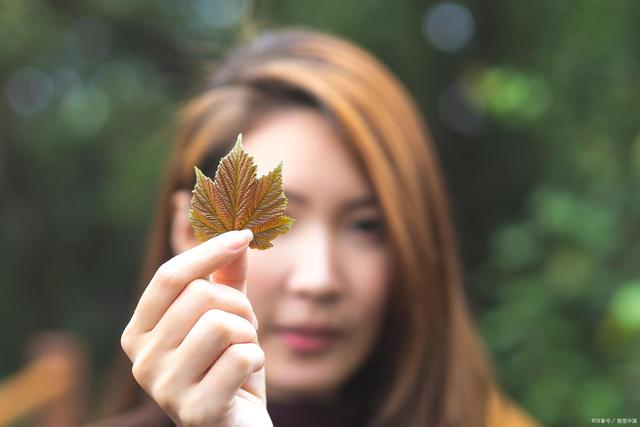
2. Add Bokeh Effect to Portraits
If
you would like to take some photos with special effects, then you should not
miss to add bokeh effect to your picture. The bokeh effect of iPhone 12 pro max
is better, which is closer to the blur of the camera. Users can adopt the mode
to shoot the background in the blur way directly. For iPhone X and newer
models, you can use portrait mode to shoot and you can add bokeh effect to it
as well. When shooting in portrait mode, slide your finger up in the middle of
the screen to adjust the background bokeh effect. If you are not satisfied with
the bokeh effect, you can click Edit again to restore the photo. Furthermore, taking portrait
photos by adding bokeh effect would make your picture more
focused and highlight the subject. If you would like to get the best bokeh
effect on iPhone, then you should not miss the best bokeh
effect apps on iPhone which would present the best bokeh
effects for you.
3. Lock Focus and Exposure
iPhone
camera has a particularly smart feature, that is, it can lock the focus and
exposure which means that if there are any changes in the scene, such as moving
objects or lights are changed, the focus and exposure you set will remain
unchanged. This is very useful in street photography. The main reason is that
the subject of street photography is uncertain, and the scene in front of you
is changing all the time. At this time, if you lock the focus and exposure in
advance, you will get the same focus and exposure. How to lock focus and
exposure? Easy job! You just need to click on the place where you want to set
the focus and hold the screen for a few seconds. A yellow prompt with AE/AF
lock will appear at the top of the screen. At this time, the focus and exposure
has been successfully locked by you!

4. Use EarPods Shutter to Reduce Camera Shake
For
a wired headset, EarPods is not just for listening to music only. In addition
to controlling music, the most distinctive function of EarPods is to control
the camera shutter. If you cannot tap the camera shutter button with one hand
when taking a photo, you can connect the wired headset to the iPhone, and then
press the center button of the control panel once to complete the photo
operation. Therefore, in order to get a better long-exposure photo, try to keep
it as stable as possible when shooting, you can use a tripod to fix the phone,
and also use EarPods instead of pressing the shutter to reduce camera shake.

5. Use Burst Mode for High-Speed Action Shots
Did
you fail to press the shutter in time? And often miss wonderful moments,
especially when shooting a moving object, either the shot is blurred, or it is
not shot. In fact, there is a very simple but often overlooked camera function
that can help us solve this problem. It is the burst mode! Except for the
iPhone 11 and the new iPhone SE, the old iPhone can activate burst mode
shooting by long pressing the shutter. In this mode, the camera can take about
dozens of photos per second until you release your finger.

6. Create Streamer Effect with Long Exposure Mode
Long
exposure is a common photography technique. Due to the prolonged exposure time,
it can record the moving trajectory of the object, and the picture will become
brighter. It is often used to shoot flowing waterfalls, clouds, star trails,
car rivers, and so on. Although most long-exposure works are shot with DSLR,
with the help of software, iPhone can also become a powerful tool for shooting
long-exposures by adding the streamer effect to the photo. Just prepare a
tripod and find a higher location for shooting, such as crossing a street
bridge and make sure that your iPhone has sufficient battery before shooting
with Live Photo long exposure mode. By the way, if you prefer more techniques
on how to take long
exposure photography, Night mode can be your another option.

7. Use HDR for Wider Dynamic Range
HDR
is the abbreviation of High-Dynamic Range. The HDR mode on the iPhone camera
can take multiple photos with different exposure levels at a time. Through the
algorithm, the best part is selected and merged into one photo. After the image
is processed by HDR, the bright part is dazzling enough without overexposure;
the dark part can see the details clearly, not completely black. Therefore, for
the wider dynamic range photo shooting, using HDR would be a wise choice.

8. Take Full Advantage of Wide Angle Lens
For
iPhone 11 and later models, they are equipped with a wide-angle lens and ultra-wide-angle lens, so
when taking pictures, you can choose different lenses to take pictures, and the
resulting picture effects are different. After turning on the camera, you will
see the word "1x" in the camera interface, indicating that you are
currently using a wide-angle lens. If you want to use the
"ultra-wide-angle" lens, click the 1x button to change to 0.5x, which
means that you are currently taking pictures with the ultra-wide-angle lens. At
this time, the scope of the picture taken by the lens will be wider.

9. Shot in ProRAW If Needed
RAW
format photos are highly respected by professional photographers because this
is a picture format that retains all the color information of the photo. The
commonly used jpg, png, heic and other photo formats are all obtained through
compression processing on the basis of RAW photos. For iPhone 12, Apple ProRAW
opened another world. What is Apple ProRAW? Simply put, after turning on this
feature on the iPhone 12 Pro series, the camera will retain more of the
original information in the picture when shooting, so that the user can get
more room for adjustment in post-editing. Shooting Apple ProRAW photos is very
simple, as long as the Apple ProRAW format function is turned on in the camera
set by the system. Then you can see the "RAW" icon on the upper part
of the camera, as long as it is turned on, you will take Apple ProRAW photos.

10. Add Location of Your Photos
You
may often use your mobile phone to take pictures. What should you do if you
want the photos you take to show the current location information? By
displaying the shooting information of the photos, the photos can be displayed
according to the shooting location, which is convenient for classifying photos.
Also, when you use the iPhone to take pictures, you can also display the
specific location of the picture. So how do you set it up so that the photos
you take can show the location? First, open your iPhone, go to Settings. In the
settings interface, scroll down to find the Privacy option, and then find the
location service option in privacy, and confirm that the Location Service is
turned on. After opening the Location Service, the programs that need to be
located will appear at the bottom of the interface, and find the
"Camera" in these programs and make sure the toggle for Camera has
been turned on.

Comments
Post a Comment