- Get link
- X
- Other Apps
In order to make sure your iPhone could run efficiently and smoothly, some cache and cookies would be created during the processes as you visit some websites and browser some contents online. Usually, these cache and cookies are used to provide some basic and useful information to offer users the better browsing experiences, however, not all of them are beneficial, instead some of cache or cookies would cause some browsing issues.
Part 1: How to Clear Safari Cache and Cookies on iPhone?
Abundant cache and cookies on your iPhone would greatly influence the running speed of your iPhone. Therefore, in order to improve your experience with the sites you visit, it is quite necessary to clear Safari cache and cookies on your iPhone. Here are the detailed steps.
Step
1. Open the Settings on your iPhone.
Step 2. Scroll down the screen until you find Safari option. Click Safari.
Step 3. On the Safari screen, scroll down to the bottom and tap on Clear History and Website Data.
Step
4. Click the Clear button if you confirm to clear the Safari cache and cookies.
Then, it is done.
Part 2: How to Clear Safari Cookies But Keeping
History on iPhone?
If
you only want to improve the Safari searching function and efficiency, then you
may only need to clear the Safari cookies while keeping history on iPhone for
further references. Without any doubts, you can clear Safari cookies or caches
only, and you don’t need to delete the browser history to clear cookies from an
iPhone. Now you can follow the steps below to delete cookies but keeping
history on your iPhone.
Step
1. Go to Settings on your iPhone and scroll down to choose Safari.
Step 2. On the Safari screen, find and select Advanced option. Then, click on Website Data option where a list of websites that store cookies in the browser can be seen. Based on your own needs, you can choose to delete all of the cookies or some specific cookies.
Step
3. If you only want to clear some specific cookies, you can simply swipe left
on any website in the list and select Delete option. If you want to clear all
of the cookies on Safari browser, then scroll down to select Remove All Website
Data and click on Remove Now to confirm the deletion.
Part 3: How to Block Safari Cookies on iPhone?
While searching for the online contents on Safari browser, many websites would adopt the cookies to track users’ behaviors and personal preferences so that they could provide more information to perfectly suit your needs or interest you. Cookies play an important role for online content marketing and as a result, Safari would usually accept cookies and website data by default when you visit the websites. But if you have more tendency towards your personal privacy, you may choose to block Safari cookies on iPhone as well. For the detailed steps, the specific steps would be provided.
Step 1. Open Settings on your iPhone and then scroll down to choose Safari.
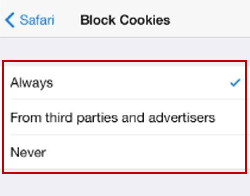
Step 2. On the Safari screen, scroll down to the bottom and you can find the option Block Cookies under Privacy & Security.
Step
3. On the Block Cookies screen, you can find Always, From third parties and
advertisers and Never. Based on your own needs, you can choose your own option.
Usually here you can choose Always.
Finally,
this is done and next time the Safari cookies on your iPhone would be blocked
then. Once it is blocked, all your data while visiting the websites would not
be shared or leaked. If you want to release the block, you can follow the same
steps to reset the related settings.
Part 4: How to Clear Cache and Cookies on iPhone from Other Browser?
Asides
from Safari browser, you can also clear cache and cookies on iPhone from other
browsers, like Google Chrome, one of the top internet explorers for iPhone in
the world. You can follow the steps below to achieve your goal.
Step
1. Open Chrome on your iPhone and on the main screen, you can find the three
dots at the bottom right. Click it.
Step
2. Select Settings >> Privacy options, and you can choose Clear Browsing
Data.
Step 3. On this panel, select Cookies, Site Data and choose Clear Browsing Data for each option respectively. Once it is done, you can clear the cookies and cache for Chrome browser.
As
well, if you would like to clear cookies and cache on iPhone from other
browsers, like Firefox and so on, you can refer to the steps above. By the way,
if you have your own preferences toward the data types, you can set your own
parameters that you would like to clear.
Part 5: How to Clear Cache and Cookie on iPhone from Other Apps?
Web
browsers can produce a lot of cookies and cache for the purpose of user
preference data analysis. But if you have run many apps on your iPhone, a large
number of cache and cookies would be created as well. Some apps may have the
function to clear the cache and cookies in an automatic way. In order to clear
cache and cookies for apps on your iPhone, the following steps would be your
useful references.
Step
1. Go to Settings on your iPhone.
Step
2. On the Settings panel, you can scroll down to see the eligible apps that
have been installed on your iPhone. Choose the target app you would like to
clear cache and cookies from.
Step 3. Tap on the app and scroll until you can find a Clear Cache option on the screen. This option would enable users to clear the cookies and data for this app. Tap it to confirm that you would like to clear cache and cookie on iPhone for this app. It goes the same way for other apps. Or you can delete the app and redownload it for thorough cleanup.
Bonus Tip: How to Back Up Before You Clear Cache and Cookies on iPhone?
Just mentioned above, clearing cache and cookies on iPhone would remove some of the visiting information away and some viewing history would be removed. In order to avoid the data being lost by accident, you had better back up your iPhone before you clear cache and cookies on your browsers. Especially when you delete the Safari history accidentally, you can recover deleted history on iPhone Safari if you made a backup.
Then, what is the best way to back up your iPhone? You can launch iTunes to back up the data on your iPhone, also iCloud can be used to back up your iPhone as well. Both of them are the default apps to manage the content on your iPhone which are convenient to use, but are limited on some key functions and features. In order to back up your iPhone without iTunes or iCloud, you can also adopt a third party transfer program to back up your iPhone as an alternative.
Among all these programs, Leawo iTransfer can be regarded as the
best. As mentioned, this iPhone transfer software enables users to transfer various
kinds of files, including apps, music, movies, TV shows, eBooks, ringtones,
photos, Camera Roll, contacts, text messages, bookmarks, and notes. With this
iPhone data transfer software, you are able to fully handle your iPhone without
messing up the data inside. The following guidance will show you use this
iPhone data transfer software to transfer all kinds of files from iPhone to
computer for backup, and you can free download the software to have a try.
Step 1. Download and install Leawo iTransfer on your computer.
Step
2. Run Leawo iTransfer and connect iPhone to computer with USB cable. The
software will recognize your iPhone.
Step
3. Click the name of iPhone and choose your preferred folder in the left
sidebar. The iPhone content will display at the right side. Here you can also
find the browser history data or the bookmarks you have added to your iPhone.
You can choose the target content you would like to back up from the left side.
Step
4. Check the square checkbox beside Name to select your preferred contents, and
click the transfer button at the right bottom. Or check the checkbox beside
each file to select the target content, and right-click a selected file, then
choose Transfer to > My Computer. Then, wait for the next step to transfer
files from your iPhone to computer.
Step
5. After selecting files to transfer, you’ll see a pop-up dialog. Check Save to
Folder and click Change to choose a folder on computer to save the chosen
files. Then click Transfer Now to start transferring files from iPhone to
computer. Just wait in patience, the files would be transferred from iPhone to
computer within several minutes. Once it is done, all of the chosen contents
would be easily transferred to your computer for future references.
Comments
Post a Comment