- Get link
- X
- Other Apps
If you want to release more space on your iPhone, then deleting all photos could be the basic step you should try. Actually, deleting photos can be an easy task for most users, but if you prefer more alternative ways to achieve the goal, in today’s post, you can find more efficient ways. The first solution, also the most convenient way, is to delete all photos from iPhone on Photos app. But an important reminder is that you should know more details on how to back up your iPhone with iTransfer. If unfortunately, you have deleted some important photos by accidently, you can also use some iOS repair tools to recover photos from iPhone. Now, if you only need to delete all photos from iPhone on Photos app, here are the details.
Part 1: How to Delete All Photos from iPhone on Photos App?Usually, all the photos you have taken are saved in iPhone Camera Roll which can be directly managed by you, including deleting, editing and so on. If you only want to remove the photos from the Camera Roll, you only need to enter the Photo app on your iPhone where you can view all photos and videos. Next, tap on the photos you want to delete, and then all the photos you have chosen would be deleted immediately. But here, these photos have not been deleted permanently, instead, all these photos actually have gone to Recent Deleted folder on your iPhone photo app.

Part 2: How to Permanently Delete All Photos from iPhone?
Following
the above steps, you can only delete the current photos from the Photo app, but
all these photos have not been deleted permanently from iPhone. In other words,
these photos would still consume some capacity on your iPhone. But if you want
to permanently delete your photos from iPhone, you had better back up your iPhone to iCloud or other storage services before you
carry out this step.
Step
1: Go to Photos app on your iPhone and navigate to the Albums tab.
Step
2: Choose Recently Deleted folder to view all the photos you have deleted from
the original photos app.
Step
3: Click on Select option, then you can view all the deleted photos on your
iPhone.
Step
4: Tap Delete All option at the bottom of the screen. Also, you can choose
Recover All to retrieve back these photos to the original folder. Once you tap
on the Delete All option, and these photos would be deleted permanently.

Part 3: How to
Delete All Photos from iPhone on Mac Using Image Capture?
For
Mac users, Image Capture can be another easy way to delete all photos from
iPhone. But this method would only be available when you use iCloud Photo
Library. You can follow the steps below to achieve your goal.
Step
1: Connect your iPhone to your Mac with a proper USB cable. Here if your Mac
doesn’t have a port, you may need an adapter.
Step 2: Open Image Capture on your Mac and then confirm that your iPhone agrees to be connected to Mac if there is any popup message on your iPhone.

Step
3: Once the iPhone has been detected by your Mac, then all the photos on your
iPhone would show up in Image Capture.
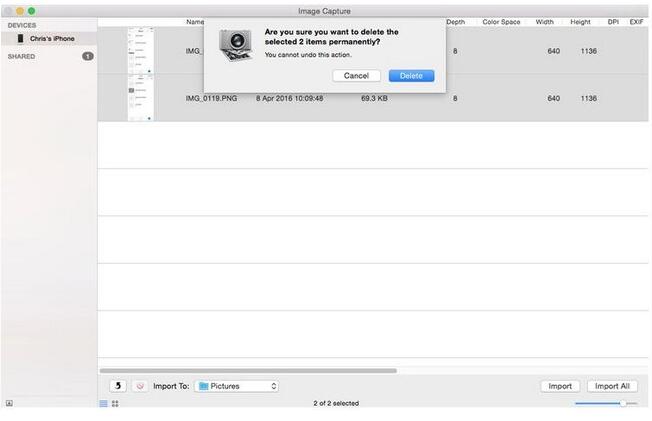
Step
4: Press the buttons Cmd + A on your Mac keyboard to select all the photos in
Image Capture, then click the small red circular icon to delete all of them.
Then you can see the popup message confirming the deletion.
Part 4: How to Delete All Photos from iPhone at Once on Windows PC with File Explorer?
iPhone
users may often come up with the problem of switching to another computer or
updating hardware for computer, and then find that the photos in their iPhone
can't be deleted though they are still available in their iPhone and take so
much storage space. When meeting this situation, the iPhone users always feel annoyed.
In fact, you can authorize the computer and connect iPhone with File Explorer
to get rid of the photos you don't need.
Step
1: Connect your iPhone with computer with the proper cable.
Step
2: Open My Computer and you can find Apple iPhone under it. Click this folder
and locate DCIM folder where you can view all the photos on your iPhone.
Step
3: Press hotkeys Ctrl+A options to select all the photos and right click to
choose to delete them all.

Then
all the photos can be deleted from your iPhone. These detailed steps would not
harm your privacy. Once you have unplug your cable and these changes would be
synced automatically. But if just as mentioned above, if you want to
permanently delete all the photos from iPhone, you had better make a complete
backup of these photos before carrying out the steps above.
Part 5: How to Delete All Photos from iPhone Using iCloud?
iCloud photos is another efficient way to store and sync your photos from your iPhone. But for many users, iCloud Photos has not been enabled before at all. If your iCloud Photos has not been activated before, then you may need to enable this function. In order to see whether you are using iCloud Photo, you can go to Settings on your iPhone and tap your name and then navigate to iCloud >> Photo. If the toggle has been turned on, that means you can manage your photos from your iPhone using iCloud, of course including deleting photos from iPhone. Now you have several ways to complete the task. The first solution is to depend on your iPhone only while the other way is to make full use of the iCloud on your computer. Next, you can view the tutorials in details.
If
you prefer to delete all photos from iPhone using iCloud, here let’s assume that
you have already enabled your iCloud Photos on your iPhone and all photos have
been synced with your iCloud account. Then you can simple open iCloud Photos on
your iPhone and choose all photos and right click to choose Delete option to
confirm your deletion on both iPhone and iCloud Photos.

If
you used to process with these changes via computer, and you also want to
remove all photos from iPhone and iCloud Photos, then you can refer to this
tutorial for more details which can be more convenient for you to carry out.
Here let’s set Mac as the example to show you how to delete all photos in
iCloud Photos.
Step
1. Open iCloud website on your Mac, sign in with the same account information
as that on your iPhone.
Step
2. Open Photos app and click on the Library option on the left side of the
screen which can guide you to the details of the iCloud Photos library.
Step 3. Use the hotkeys CMD+A to select all photos and simply press the Delete key to confirm your deletion. Then, immediately all the photos would be deleted from iCloud and iPhone.

Here, following the steps below would only delete the photos from iCloud, but it is not truly to delete all the photos yet. Instead, all the chosen photos would be removed to a Recently Deleted album. All these photos would stay for 30 days in this album and you can empty the Trash album to permanently delete all the photos if you prefer. Therefore, if you want to delete all these photos permanently from both iPhone and iCloud account, you have to do one more step. Go to the Recently Deleted album in the Photos app and choose all these photos, finally click Delete All to remove all photos from your library.
Part 6: How to Delete All Photos from iPhone But Not iCloud?
If
you only want to delete photos using from iPhone, but make sure all the photos
remain the same in your iCloud account, in other words, you don’t want to sync
with your iCloud account once you delete the photos from iPhone, then you can
easily turn off the iCloud Photo option by following the above route under the
Settings on your iPhone. You can directly go to Settings on your iPhone and tap
your name and then navigate to iCloud >> Photo, turn on the Photo toggle
to disable iCloud Photos option. Then, all the changes you have changed to your
iPhone would not be synced to your iCloud. But here you may be asked to download
a copy of your iPhone data before you make any deletion from your iPhone. Take
it ease here, if you forgot the backup of your iPhone and some important data
have been lost, you can also recover then with the help of Leawo iOS Data Recovery which can allow you to preview and select the files that you want to
recover, which can work easily to scan and search for files and data with very
accurate results. It is compatible with all iOS devices and all versions of
iOS.

Comments
Post a Comment